It’s really easy to setup your own blog now a days. So much so that it can be done within an hour. But being a first timer, it’s always convenient to have a handy guide at your disposal. Since we setup our own blog last year, many readers and friends queried us about how to setup own blog. And we promised them a post elaborating the process. So that it becomes even more easier and smoother for you all. And saves you the small hassles that we had to go through being novices.
![]()
Table of Contents
1)Decide on your domain name to setup your own blog
Yes, there are free blog hosting platforms like google blogspot, WordPress and many more. And we also used blogspot for couple of years before setting up our own blog. In fact, that is when we realized that there is definitely advantage of owning your own exclusive domain name. And we list some of these here:
- You do away with the ugly suffix that blogspot and others tend to add to your domain name, when you use their free platform. And thus, it looks so much more professional.
- It hardly costs you anything. And it is very cheap.
- It gives you the flexibility to be the exclusive owner. And you can sell the domain name in future if you want to.
So, go get a domain name. It can be purchased independently and then used to setup your blog on any hosting server that you decide to use. But be thoughtful about the name you choose.
- Think about how much flexible or how much tightly coupled you want to keep it with your blog theme.
- Brainstorm about good domain names and note them down.
- Check the internet to find out if something with this name already exists. Strike through your list, and finally arrive at a unique domain name.
If I recall correctly, it took us almost same amount of time to setup the website as it took to figure out the domain name :). We personally wanted our domain name to be flexible so that we can add diverse content to it in future. But we also wanted it to be trendy and easy to remember. Some time, we will talk more about the traits of a good domain name.
2)Buy a hosting space to setup your own blog
So you got your domain name. What’s next? You got a name for your website. Now you need a space to set it up physically. There are different hosting providers in today’s market. We went with bluehost for our own blog. And hence, we provide you here the steps to hosting your website on bluehost server. To be honest, we didn’t do too much comparison of different hosting providers. Bluehost mostly has lucrative and price effective offers going. And we chose the best suited one for our need. So far, we are satisfied with the service. Some of the reasons being:
- The prices are very competitive and suited to the budget user.
- Right from the point of buying the package through the lifetime of your website, the assistance of bluehost is at your disposal, just a phone call away, 24/7.
- Even people with non – technical background can setup an account very easily with bluehost. Because there are technical assistants available to take care of most of the technical aspects right from the setup onwards.
That said, here goes the set of steps to host your website up and running on bluehost server.
Users from India can follow this link to get hostnig space from bluehost.
Others, follow this link to get the hosting space from blue host . OR, click the below image, and then follow the steps listed in sections below.
PS: The steps are mostly the same for India and global. The screenshots shown here are for global. But users from both the locations can follow the same screenshots.

2.1)Get started to setup your own blog
Click on the “get started now” button on the link where you land after clicking on the above image.
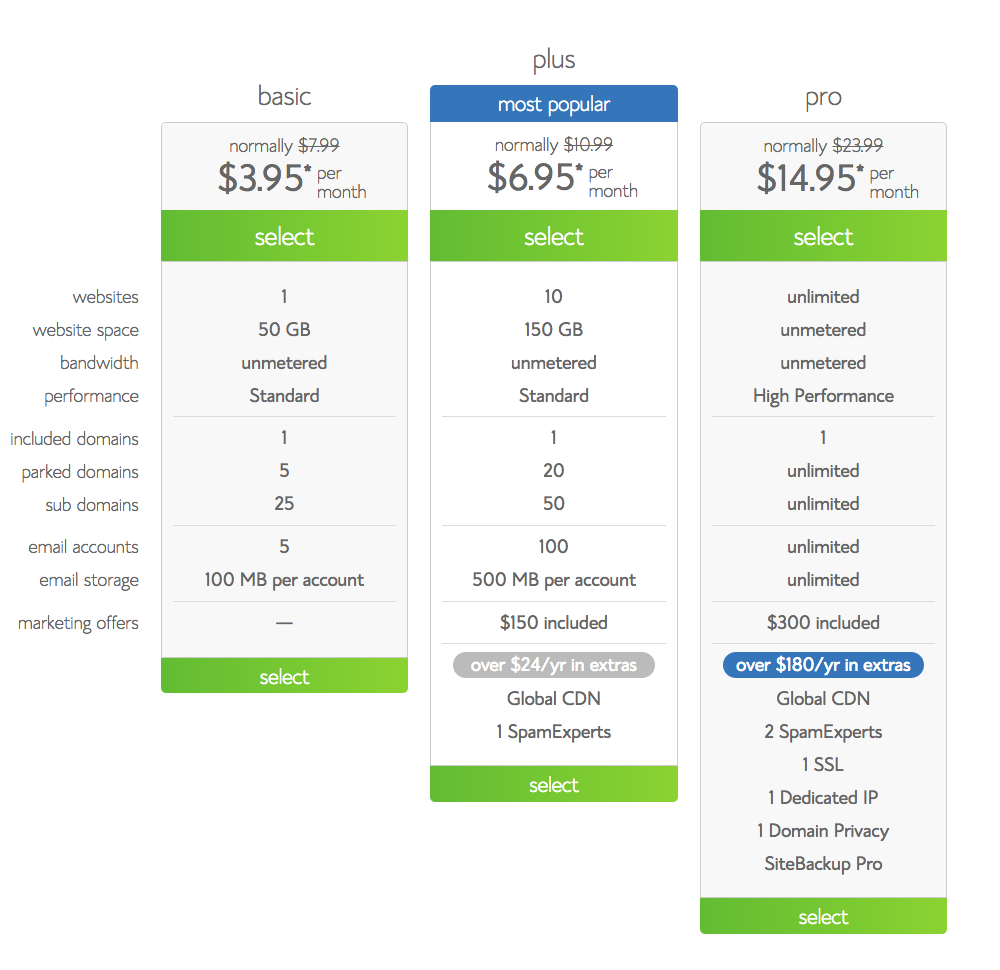
2.2)Choose a suitable plan
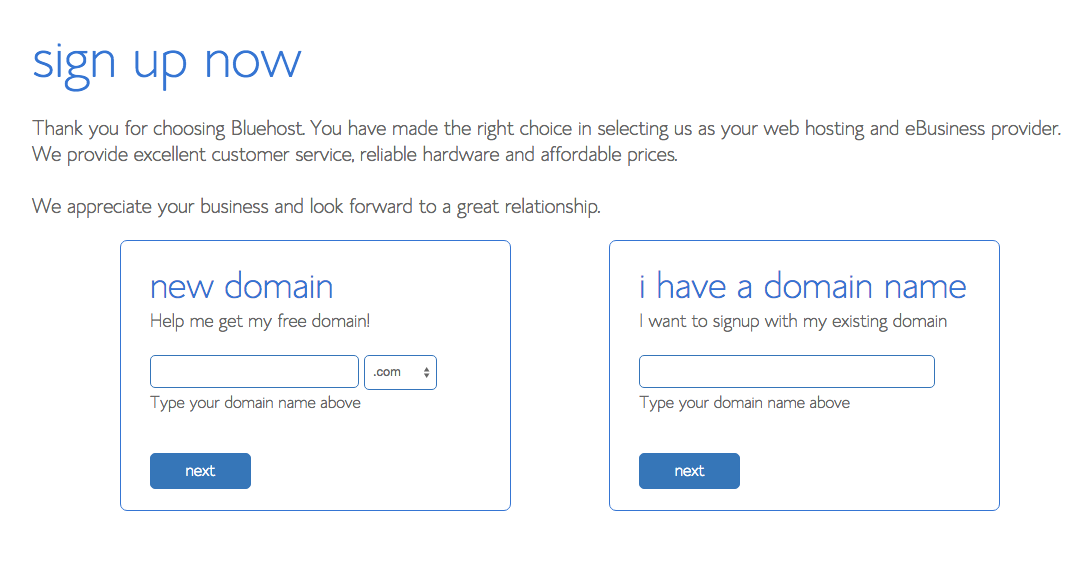
2.3)Either buy a new domain or if you have an existing domain link it.
Type in your domain name in the left box and then click “next” to see if it is available.If you already own a domain name and want to use it for your blog, type your existing domain in the right box and then click “next”. But you should have already purchased a domain name earlier in this case. Otherwise, you should go with the left box and choose a domain name.
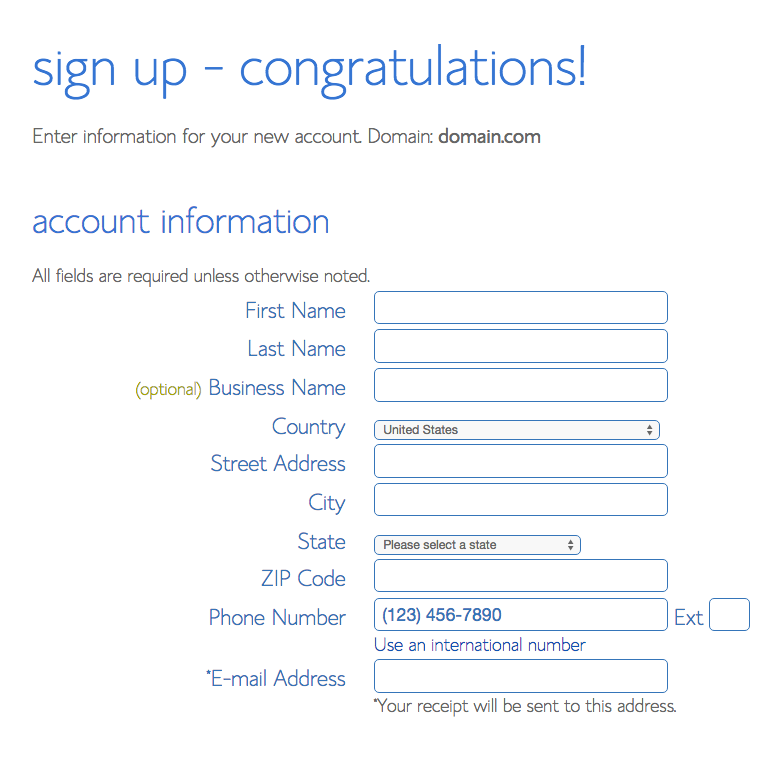
2.4)Create an account on bluehost
After choosing your domain name above, the next step is to create an account on bluehost.
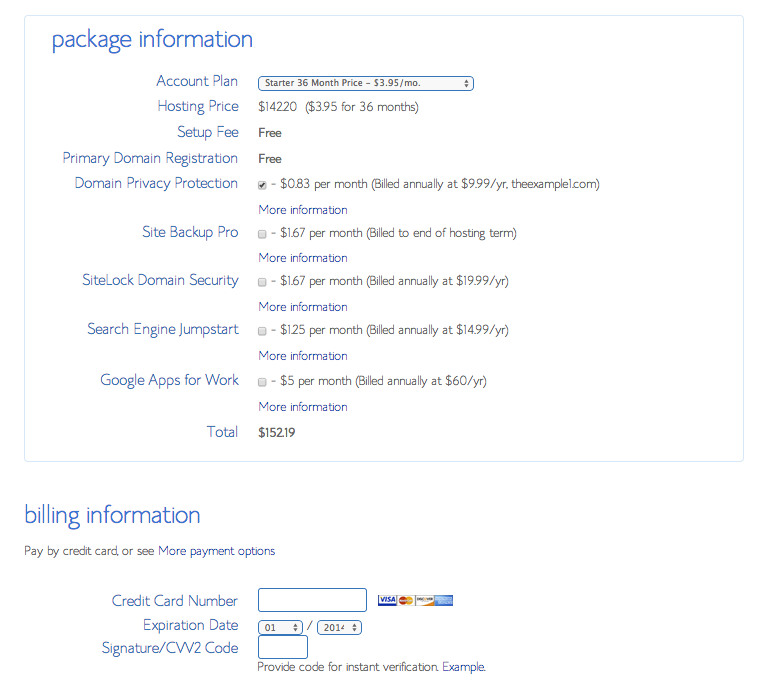
2.5)Choose your hosting package and options & buy your plan
As a beginner you can start with the basic plan. We are due for a renewal and we are planning to add a few extra things in our cart this time. Like an antivirus software and backup support for the website. Being a serious blogger, you will be putting in a lot of effort in creating your posts and setting up your website. And you definitely don’t want that to get wasted. So, backup is a must.
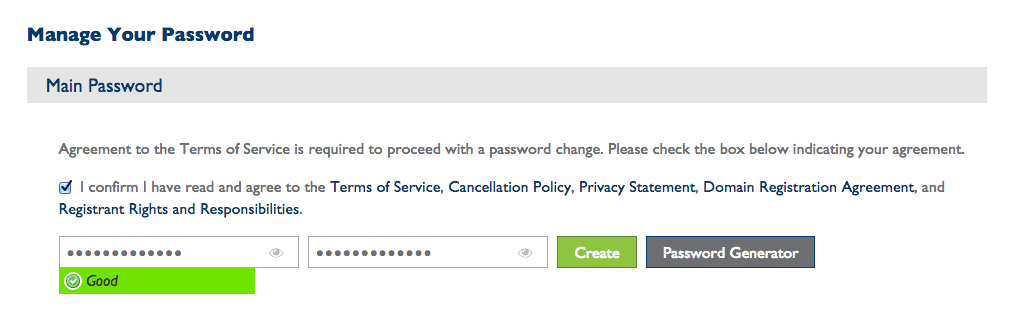
2.6)Setup your account password
Once the payment is made successfully, you will get a screen like the below one, welcoming you to bluehost. It will also ask you to setup your password for the bluehost account.
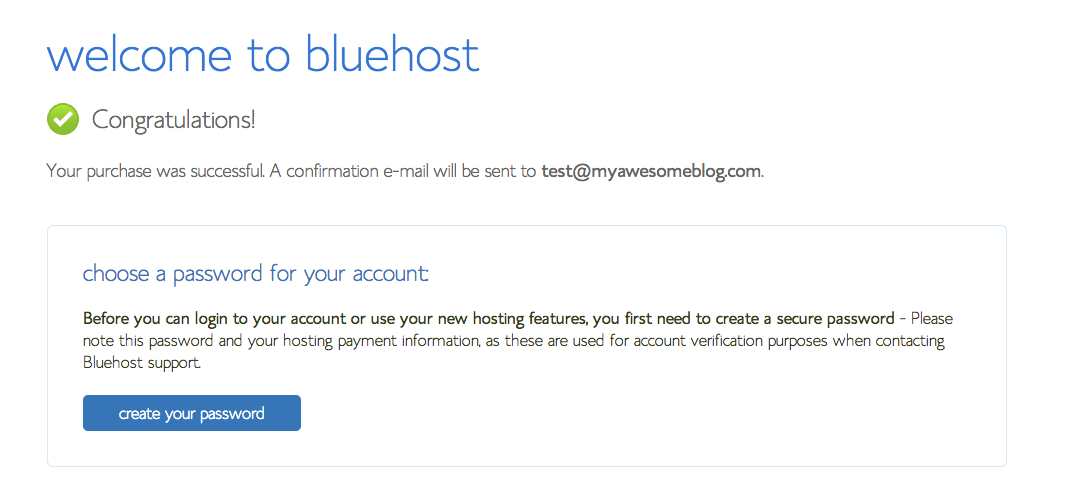
Clicking on the above “create your password” link takes you to “Manage Your Password” screen below. Here, you can create a password for yourself.
2.7)Wait for a mail from bluehost with the details
After this step, you will need to wait for a few hours or so for a mail from bluehost. Your new domain information takes some time to setup and get activated. In the meanwhile, bluehost will send you an email with a temporary url using which you can login into bluehost “control panel” and setup your website. Control panel is an interface to the underlying system on which you have installed your website. This provides you access to all the important areas of your website. You will particularly want to access the following to start with:
- File Manager : Here you can see all the files (html, css, javascript etc.) on your website. You can read/write/modify them. More on it some other time.
- WordPress : This will be used to setup your WordPress account. (Explained in the next step below)
- PhpMyAdmin : This will be the interface to setup your database, or make any direct changes to the database. You might or my not need to do direct changes to the database depending on your requirements and technical expertise.
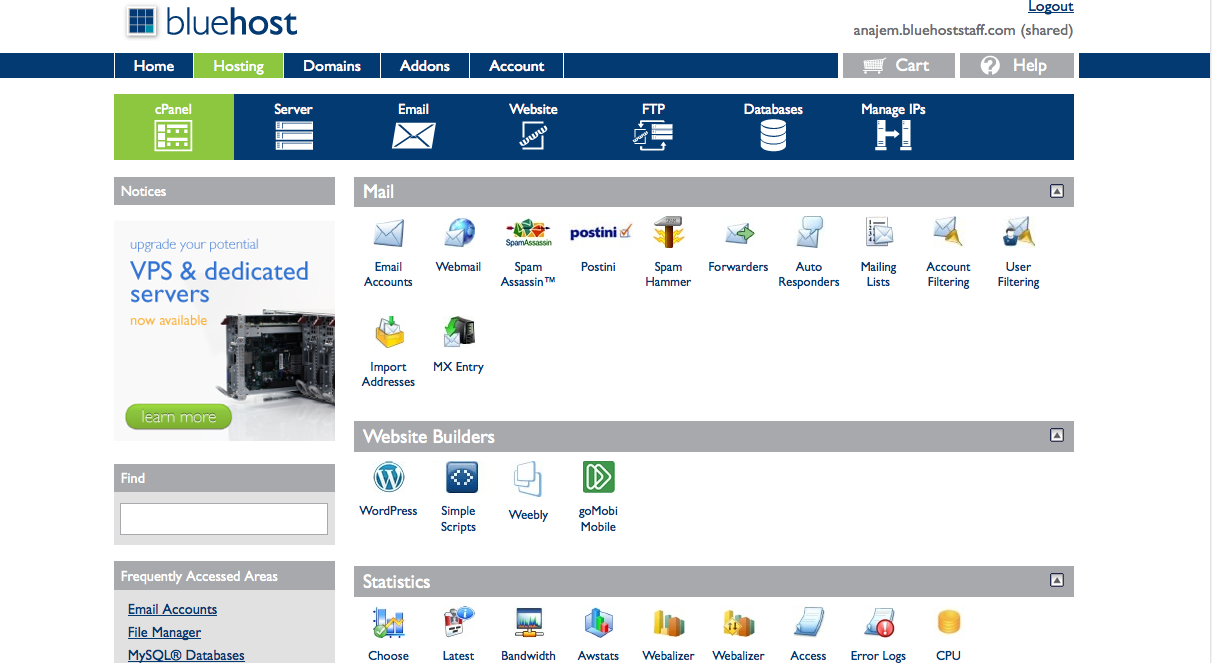
2.8)Login to the control panel
One you login to control panel, below is the screenshot of the interface you land on.
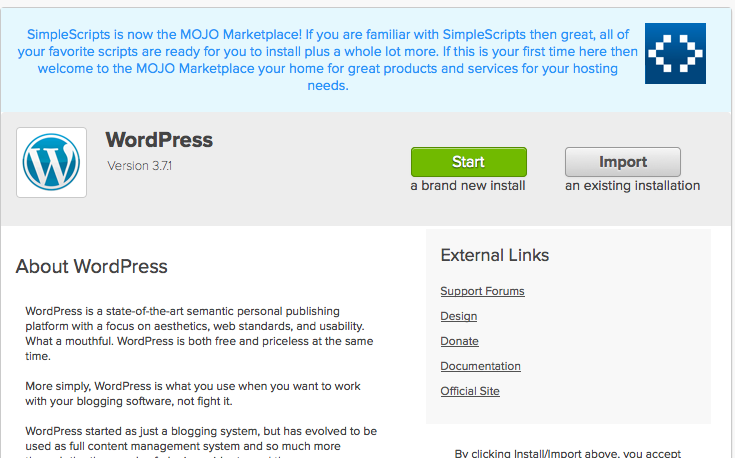
3)Install wordpress
Head under the “Website Builders” heading on your control panel and click the “Install WordPress” link. This will take you to the MOJO Marketplace. And on the WordPress installation page. Click on the “Start” button.
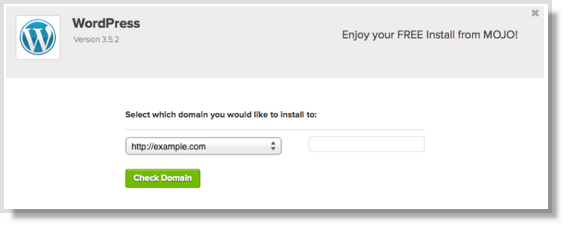
Next perform a check to make sure your domain name is detected. For this, on the next window that comes, select your domain and click “Check Domain”.
Click on “install” button next. The WordPress installation will start.

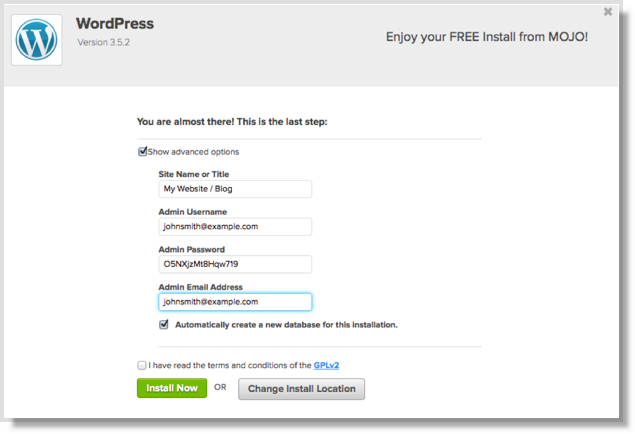
Enter in your site title, username, and password. All of them except the username can be changed later. Take a note of your username and password somewhere! Finally, check the box to agree to the terms and then click “Install Now”.
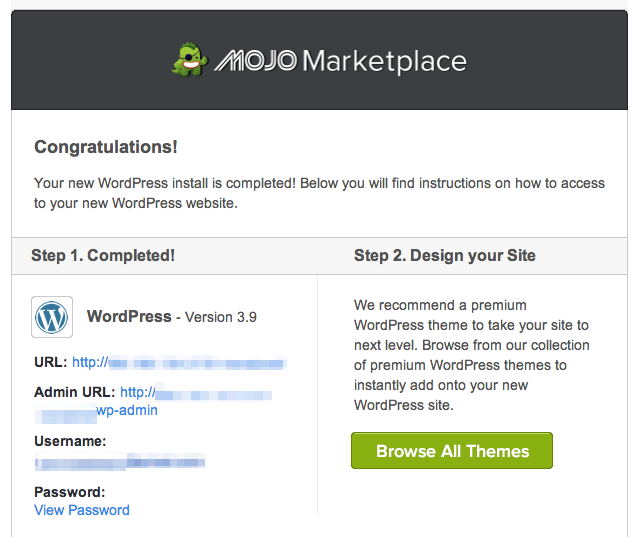
It will take just a few minutes for WordPress to install. But once the installation has completed you can click “View Credentials” at the top of the page to see your login information. This information is only available for next 12 hours, so make sure to note it down before it is wiped off. Finally on successful installation you will get something like the below screen:
4)Login to your WordPress site & understand your options
After the successful installation of the WordPress website, you will get a mail with the following message from the MOJO marketplace.
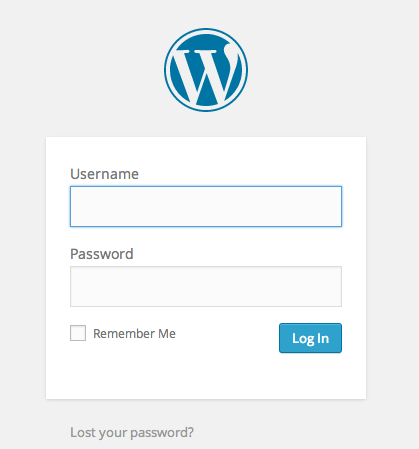
You can next go to the WordPress login screen to login into WordPress website.
Once you login into your WordPress site, you land on the WordPress panel that looks something like this:
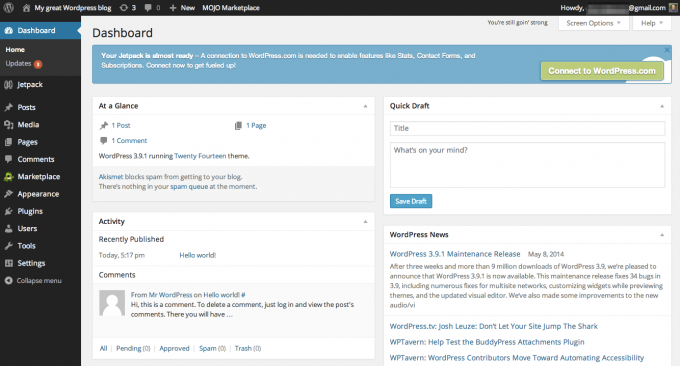
Click through the various options on the left hand side of your dashboard. And explore them to understand what each one of them offer.
5)Get a theme setup for your blog
WordPress has many pre-defined themes to set the look and feel of your website. You can install one of these and get a standard site look setup within a few minutes. For this head to Appearence->Themes. And you can search for a theme name here. Google for WordPress themes. Come back to Appearence->Themes and type your theme name in the search box on the right hand side. You can either download the theme on your system and then upload and install from there. Or, you can directly install it on your WordPress blog. We experimented a lot with different themes before moving on to the one which best suited our requirements.
You should choose a theme which allows you easy alternations. For instance, if you plan to display paid advertisements on your website in future, your wordpress theme should support good advertisement designs . Also, it should be fast and responsive so that your website ranks well for search engines.
6)Get some useful plugins installed
There are tons of WordPress plugins available out there. Almost for everything that you might want to do on your website. We list here some plugin requirements that will be essential for you in the beginning.
- Email/Subscription manager. A plugin to manage your blog’s email subscriptions. It should have features for sending mails and notifications to the subscribers about new posts, periodic newsletters etc. , sending you notifications about users (assuming you are the admin) Basically one plugin to manage all inbound and outbound mails for your blog.
- SEO optimization plugin. To ensure your content is following the SEO guidelines and is optimized for SEO.
- Socializer plugin. It helps you add social media icons and link them to your social media accounts like facebook, twitter, instagram, pinterest and many more so that users can follow you from here on the click of a button. The same plugin can as well configure social icons on your blog to facilitate the users to share your posts on their favorite social media platforms.
- Importer-Exporter Plugin. If you want to import your posts from some other blog that you previously had, you can install an importer – exporter plugin for the same.
- Optimizer plugin. A plugin to optimize your blog content following best web content practices like minifying, caching, zipping and other optimizations of the content. It can also help manage your web content CDN.
- A few other plugins that we found useful , but you might not need them immediately, are for:
- Adding any header or footer html to your webpage.
- Adding any html or plain text to your website anywhere.
- Setting-up redirect for your post urls in case they get modified at any point of time.
Feel free to explore more plugin options based on your needs. All you need to do is google your requirement with “WordPress plugin” prefixed. For instance, “WordPress plugin to watermark my images”. Next you can weed through the search results and use the one as per your liking.
7)Write your first post
Once done with the above setup, you are all set to start creating content for your blog. So, head straight to the Posts->Add new section on your WordPress dashboard. It will open a text editor for you. And you can write your post here. Once done, you can either save it as a draft for future or you can publish it right away. Using a scheduler plugin, you can schedule your post as well for publishing at a pre-set time in future.
So here you go. You setup your blog in 7 simple steps and your first post is ready as well. Happy blogging!!
P.S. : The information in this post is totally based on our own experience during setting up of our blog. If you want to add anything, enhance the steps or have any other valuable feedback for us in this respect, do leave us a comment. Also, if any of the above steps didn’t work out for you, feel free to leave a comment here and we will get back to you as soon as possible with the solution. This will also help us add a troubleshooting section in the post to help you further!
PS: Some of our links are affiliated, this means we will earn a commission when you buy a service or product by clicking those links. However, this will have no extra cost for you.
Very informative blog! The highlighted points in the blog are useful for the beginners who want to set up their blog. Thanks for sharing
When I started blogging in 2010, I didn’t care about getting my own domain, I wish I had done that, then I wouldn’t have had to transfer to another site and lose all of my old followers. I also started with Bluehost, but the renewal rate is so expensive, I moved my hosting to Siteground, but I retained my domain with Bluehost. You have given a pretty extensive guide, I’m sure anyone who has been thinking of creating his/her own blog will find this useful. Great job!
We all miss something when we start up because often there is lack of information. We wish to have added https to our website at the beginning itself. I want to do it now, but I am not sure of the implications towards traffic, DA etc. so afraid to do it.
This has been very interesting. Slowly I’m trying to set up my blog and still need help to understand plenty of things.
You can write to us or drop a comment here with your question. I hope we will be able to help.
Though I have commented on this post earlier, let me share my experience with blogging; 1. It gets better with time. 2. Your blog is your baby, the more you tend it, the better and well mannered your blog will turn out to be. 3. Focus on non-Search traffic sources as well.
Totally agree. It gets better with time. You need to have a lot of patience and you need to nurture your blog like a baby